

How to Properly Apply Blue Vinyl Wraps - www.vinylcarwrapshop.com
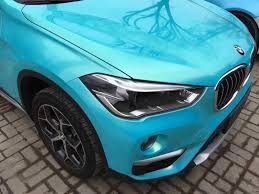
Vinyl wraps have revolutionized the way we personalize vehicles, offering a sleek, professional finish without the need for permanent paint jobs. Among the most popular choices is the bold and vibrant blue vinyl wrap, which can give your car a fresh, eye-catching look. However, achieving a flawless finish requires attention to detail and the right techniques. Here's a step-by-step guide to properly apply Blue Vinyl Wraps to your vehicle.
Step 1: Gather Your Tools
Before starting, assemble all the necessary tools. You'll need:
- A high-quality blue vinyl wrap
- A squeegee or application tool
- Heat gun or hairdryer
- Cleaning solution (alcohol-based)
- Microfiber cloths
- Utility knife or precision blade
- Gloves (optional)
Having the right tools ensures a smoother application process and reduces the risk of errors.
Step 2: Prepare Your Vehicle
Proper preparation is key to achieving a professional finish. Begin by thoroughly washing your car to remove dirt, grease, and debris. Use an alcohol-based cleaner to eliminate any remaining residue. Ensure the surface is completely dry before proceeding. Pay extra attention to edges, crevices, and curves, as these areas are prone to trapping dirt that can affect adhesion.
Step 3: Measure and Cut the Vinyl
Unroll the blue vinyl wrap and measure it against the section of the vehicle you're covering. Cut the vinyl slightly larger than the area to allow for adjustments during application. It's better to have excess material that can be trimmed later than to fall short.
Step 4: Apply the Vinyl
Peel back a small portion of the backing paper and align the vinyl on the surface. Start in the middle and work outward, using a squeegee to press down the vinyl and remove air bubbles. Work slowly and methodically, peeling back more of the backing paper as you go. For curved areas, use a heat gun to make the vinyl more pliable and easier to mold.Bronze Vinyl Wraps
Step 5: Smooth and Trim
Once the vinyl is applied, go over it with the squeegee to ensure there are no wrinkles or bubbles. Use a heat gun to gently heat the edges and corners, pressing down firmly to secure the wrap in place. Finally, use a utility knife to trim away any excess material for a clean finish.
Step 6: Post-Application Care
After applying the wrap, avoid washing your car for at least 48 hours to allow the adhesive to fully bond. When cleaning your car in the future, use gentle, non-abrasive products to maintain the integrity of the vinyl.
Final Thoughts
Applying a blue vinyl wrap can transform your vehicle's appearance while protecting its original paint. By following these steps and taking your time, you can achieve a professional-looking result that turns heads on the road. If you're unsure about tackling this project yourself, consider seeking help from a professional installer for a flawless finish.
For more tips and high-quality vinyl wraps, visit [www.vinylcarwrapshop.com].
![]()